Generate SLSA Provenance
Harness SCS when used along with Harness CI Hosted Builds(Harness Cloud), ensures that the resulting artifacts have SLSA Level 3 provenance that every consumer (including the following deployment stage) can verify for artifact integrity prior to making use of this artifact. Build hardening for Level 3 compliance is achieved through:
- Built-in infrastructure isolation for every build where new infrastructure is created for every run and deleted after the run completes.
- OPA policy enforcement on CI stage templates with non-privileged, hosted containerized steps that do not use volume mounts. This disallows the build steps to access the provenance key information in compliance with SLSA specifications.
End result is that hackers cannot do tampering during the build process. This capability when coupled with open source governance through SBOM lifecycle management provides the most advanced shift-left supply chain security solution in the market today.
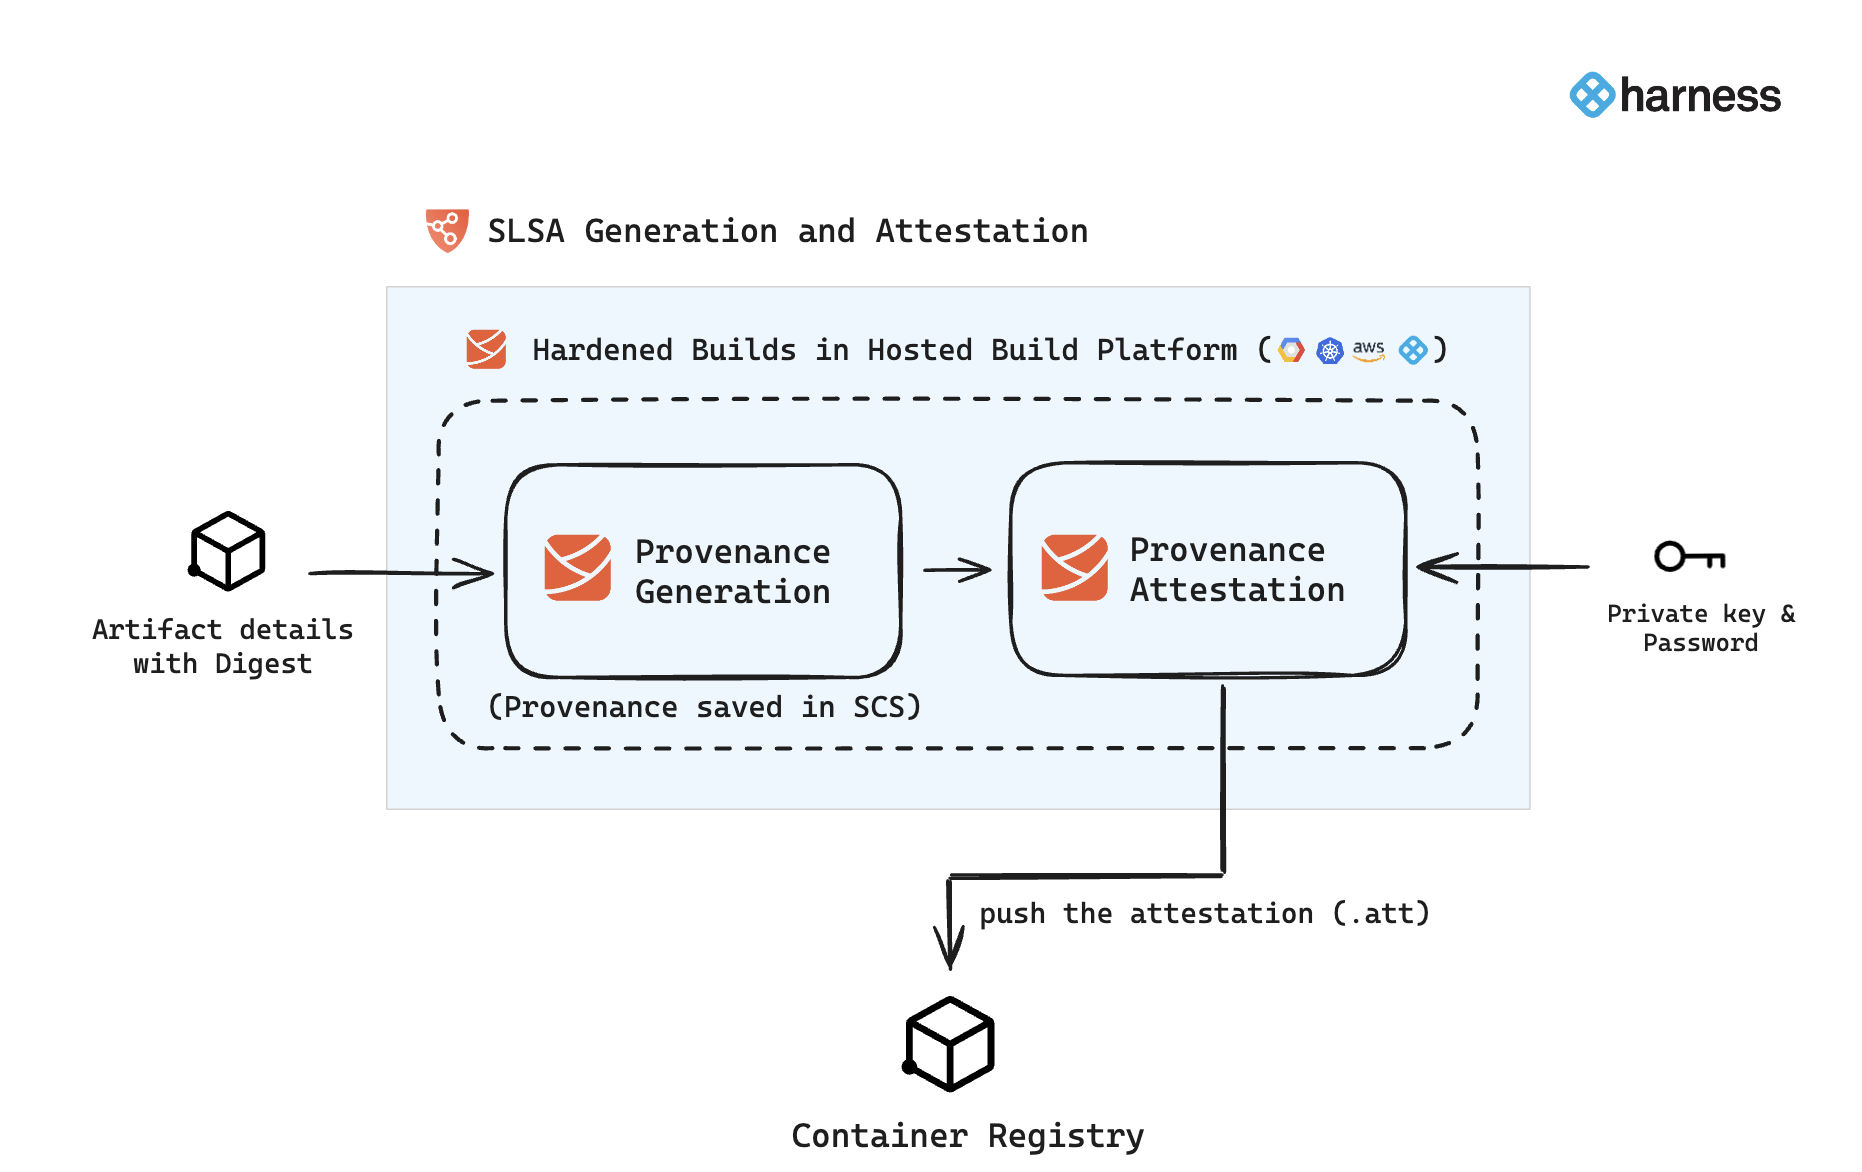
In Harness SCS, you can use the SLSA Generation step to configure your pipeline to generate SLSA Provenance and optionally attest and sign the attestation. The generated provenance is saved in Harness and can be easily accessed from the Artifact section in SCS. If the provenance is attested and signed with keys, the resulting attestation file (.att) is pushed to the container registry. Here's an overview of the workflow:

The configuration for SLSA Generation and attestation previously handled in the Overview section of the pipeline stage is no longer supported. To generate SLSA Provenance and attestation, use the dedicated SLSA Generation step. For detailed instructions, refer to the SLSA Generation step configuration documentation. If your pipelines are currently configured through the Overview section, we strongly recommend migrating to the SLSA Generation step to ensure compatibility and continued support.
SLSA Generation step configuration
The SLSA Generation step enables you to generate SLSA Provenance and optionally attest it. The generated provenance is saved in the Artifact section in SCS, while the attestation file is pushed to the configured container registry. This step should be configured immediately after completing your image-building process, as the image digest is required for provenance generation and attestation.

Follow the instructions below to configure the SLSA Generation step.
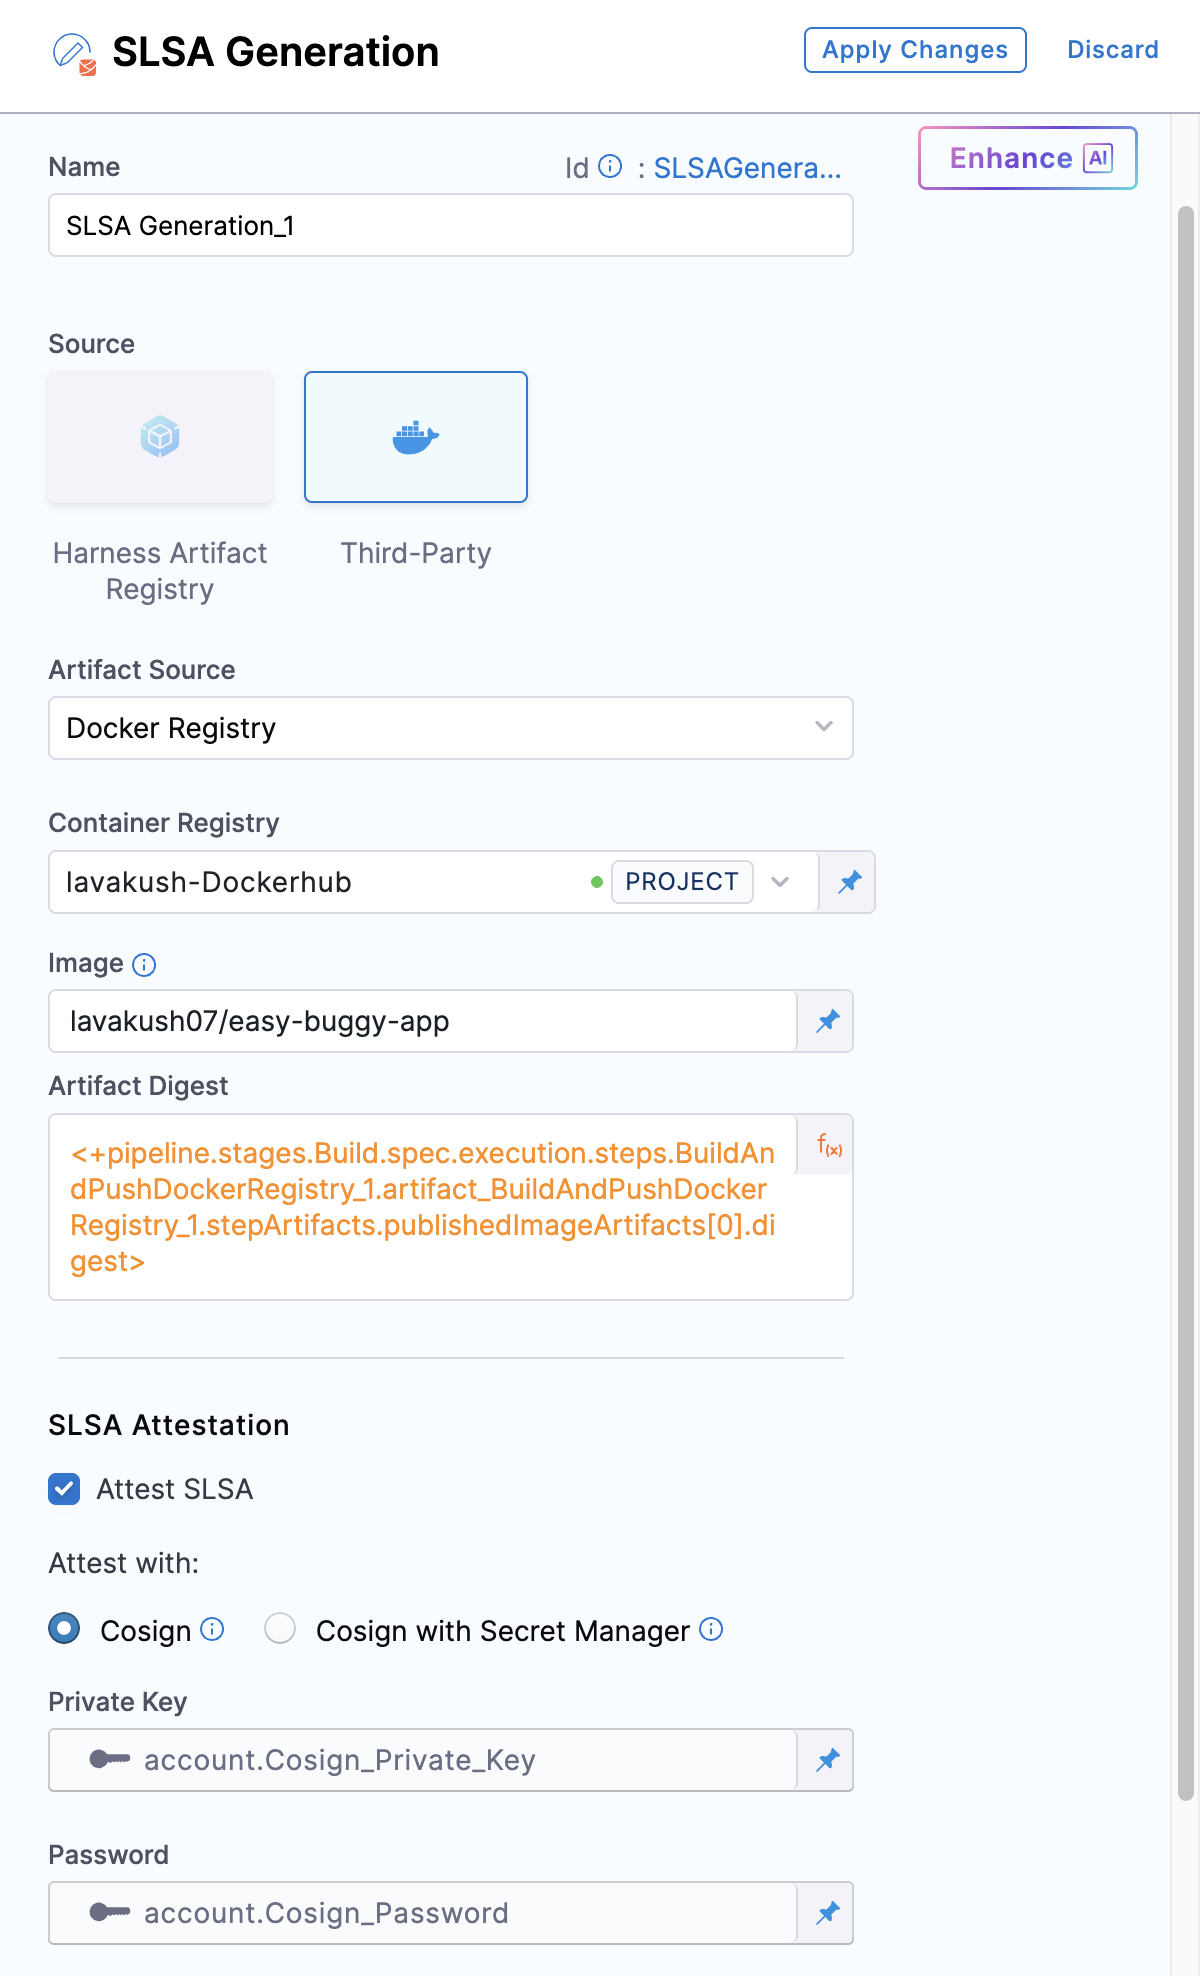
- Search and add the SLSA Generation step to your pipeline. It is important to place this step immediately after the steps that complete your image-building process, as it requires the artifact digest as input.
- Artifact Source: Configure your artifact source by selecting from the options available in the dropdown menu. You can choose from DockerHub, ECR, ACR, or GAR. Select the corresponding artifact source tab below for detailed instructions on configuration.
Google Container Registry (GCR) has been deprecated and shut down. As a result, we no longer support GCR for the SLSA Generation step.
- HAR
- DockerHub
- ECR
- ACR
- GAR
-
Registry: Select the Harness Registry configured for the Harness Artifact Registry where your artifact is stored.
-
Image: Enter the name of your image with tag, such as
imagename:tagorimagename@sha256:<digest>.
-
Container Registry: Select the Docker Registry connector that is configured for the DockerHub container registry where the artifact is stored.
-
Image: Enter the name of your image using a tag or digest, example
my-docker-org/repo-name:tagormy-docker-org/repo-name@sha256:<digest>
-
Container Registry: Select the Docker Registry connector that is configured for the Elastic container registry where the artifact is stored.
-
Image: Enter the name of your image with tag or digest, example
my-docker-repo/my-artifactormy-docker-repo/my-artifact@sha256:<digest>. -
Artifact Digest: Specify the digest of your artifact. After building your image using the Build and Push step or a Run step, save the digest in a variable. You can then reference it here using a Harness expression. Refer to the workflows described below for detailed guidance.
-
Region: The geographical location of your ECR repository, example
us-east-1 -
Account ID: The unique identifier associated with your AWS account.
-
Container Registry: Select the Docker Registry connector that is configured for the Azure container registry where the artifact is stored.
-
Image: Enter your image details in the format
<registry-login-server>/<repository>. The<registry-login-server>is a fully qualified name of your Azure Container Registry. It typically follows the format<registry-name>.azurecr.io, where<registry-name>is the name you have given to your container registry instance in Azure. Example:automate.azurecr.io/<my-repo>:tagor you can use digestautomate.azurecr.io/<my-repo>@sha256:<digest> -
Artifact Digest: Specify the digest of your artifact. After building your image using the Build and Push step or a Run step, save the digest in a variable. You can then reference it here using a Harness expression. Refer to the workflows described below for detailed guidance.
-
Subscription Id: Enter the unique identifier that is associated with your Azure subscription.
-
Container Registry: Select the Docker Registry connector that is configured for the Google container registry where the artifact is stored.
-
Image: Enter the name of your image with tag or digest, example
repository-name/imageorrepository-name/image@sha256:<digest>. -
Artifact Digest: Specify the digest of your artifact. After building your image using the Build and Push step or a Run step, save the digest in a variable. You can then reference it here using a Harness expression. Refer to the workflows described below for detailed guidance.
-
Host: Enter your GAR Host name. The Host name is regional-based. For example,
us-east1-docker.pkg.dev. -
Project ID: Enter the unique identifier of your Google Cloud Project. The Project-ID is a distinctive string that identifies your project across Google Cloud services. example:
my-gcp-project
With this configuration, the step generates the SLSA Provenance and stores it in the Artifact section of SCS. To attest to the generated provenance, follow the instructions in the section below.
Attest SLSA Provenance
To configure attestation, along with the above configuration, you should enable the SLSA Attestation checkbox in the SLSA Generation step. This requires a key pair generated using Cosign. Attesting the provenance enhances pipeline security by ensuring its integrity and preventing tampering. To understand the attestation process, see attestation and verification concepts.
You can perform the attestation with Cosign or Cosign with Secret Manager
- Cosign
- Cosign with Secret Manager
To perform attestation with Cosign selected, you need a key pair. Follow the instructions below to generate the key pair. To perform the attestation process, you need to input the private key and password. Use Cosign to generate the keys in the ecdsa-p256 format. Here’s how to generate them:Generate key pairs using Cosign for SBOM attestation
cosign generate-key-pair to generate the key pairs..key file and a public key as a .pub file. To securely store these files, use Harness file secret.
- Private Key: Input your Private key from the Harness file secret.
- Password: Input your Password for the Private key from the Harness file secret.
In this mode, you can pass your Cosign keys using a Secret Manager. Currently, SCS supports only the HashiCorp Vault secret manager. You can connect your Vault with Harness using the Harness HashiCorp Vault connector. Here are the key points to consider when connecting your Vault:
Ensure your Harness delegate is version 24.11.84200 or higher. Upgrade if you're using an older version to enable this feature.
- Enable the Transit Secrets Engine on your HashiCorp Vault. This is essential for key management and cryptographic operations.
- Configure your HashiCorp Vault connector using the following authentication methods AppRole, Token or Vault Agent.
- Create a Cosign key pair of type
ecdsa-p256in the Transit Secrets Engine. You can do this in two ways:- CLI: Run the command:
vault write -f <transit_name>/<key_name> type=ecdsa-p256 - Vault UI: Create the key pair directly from the Vault interface.
- CLI: Run the command:
- Ensure the Vault token generated has the required policy applied for Cosign to perform attestation operations.
Configure the following fields in the step to perform the attestation
- Connector: Select the HashiCorp Vault connector.
- Key: Enter the path to the Transit Secrets Engine in your HashiCorp Vault where the keys are stored.
Here’s an example of what the signed attestation would look like
{
  "payloadType": "application/vnd.in-toto+json",
  "payload": "CJTUERYUmVmLVBhY2thZ2UtZGViLXpsaWIxZy1mOTFhODZjZjhhYjJhZTY3XCIsXCJyZWxhdGlvbnNoaXBUeXBlXCI6XCJDT05UQUlOU1wifSx7XCJzcGR4RWxlbWVudE",
  "signatures": [
    {
      "keyid": "dEdLda4DzZYoQgNCgW",
      "sig": "MEUCIFoNt/ELa4DzZYoQgNCgW++AaCbYv4eOu0FloUFfAiEA6EJQ31P0ROEbLhDpUhMdMAzkqlBSCMFPDk1cyR1s6h8="
    }
  ]
}
Additionally, you can perform Base64 decoding on the payload data to view your SLSA Provenance. For verifying the SLSA attestation, please refer to Verify SLSA documentation.
Run the pipeline
When you run a pipeline with SLSA generation enabled, Harness SCS:
- Generates an SLSA Provenance for the image created by the Build and Push steps in the Build stage.
- Generates and signs an attestation using the provided key and password.
- Stores the SLSA Provenance in Harness and uploads the
.attfile to your container registry alongside the image.
The signed attestation is stored, as an .att file, in the artifact repository along with the image. You can also find the SLSA Provenance on the Supply Chain tab on the Execution details page in Harness. For more information, go to view pipeline execution results.
Provenance example
Here's an example of an SLSA Provenance generated by Harness SCS. The information in your SLSA Provenance might vary depending on your build and changes to the provenance structure applied in SCS updates. Identifiers, repo names, and other details in this example are anonymized or truncated.
{
  "_type": "https://in-toto.io/Statement/v0.1",
  "subject": [
    {
      "name": "index.docker.io/harness/plugins",
      "digest": {
        "sha256": "2deed18c31c2bewfab36d121218e2dfdfccafddd7d2llkkl5"
      }
    }
  ],
  "predicateType": "https://slsa.dev/provenance/v1",
  "predicate": {
    "buildDefinition": {
      "buildType": "https://developer.harness.io/docs/software-supply-chain-assurance/slsa/generate-slsa/",
      "externalParameters": {
        "codeMetadata": {
          "repositoryURL": "https://github.com/nginxinc/docker-nginx",
          "branch": "master"
        },
        "triggerMetadata": {
          "triggerType": "MANUAL",
          "triggeredBy": "Humanshu Arora"
        }
      },
      "internalParameters": {
        "pipelineExecutionId": "UECDFDECEn8PpEfqhQ",
        "accountId": "ppbDDDVDSarz_23sd_d_tWT7g",
        "pipelineIdentifier": "SLSA_Build_and_Push",
        "tool": "harness/slsa-plugin"
      }
    },
    "runDetails": {
      "builder": {
        "id": "https://developer.harness.io/docs/continuous-integration/use-ci/set-up-build-infrastructure/which-build-infrastructure-is-right-for-me"
      },
      "metadata": {
        "invocationId": "aRrEdsfdfdRwWdfdfdecEnwdg",
        "startedOn": "2024-11-26T09:37:18.000Z",
        "finishedOn": "2024-11-26T09:37:18.000Z"
      }
    }
  }
}
Verify SLSA Provenance
After generating SLSA Provenance, you can configure your pipeline to verify SLSA Provenance.